Nowadays, technology is evolving and moving rapidly every day. The problems that need to be solved are becoming more complex and their number is increasing, but besides all of the novelties and diversity of the problems itself, some of the general engineering principles remain the same as time passes by.
Have you ever gotten advice or comment on your PR from more experienced engineers, that you should not repeat the code, to reuse the logic already written somewhere or to keep things simple, modular with a single responsibility? At the first glance, it can look like splitting hairs, but as a product and codebase grows, you start realizing its value.
There are a lot of perspectives from which we, as engineers, can take a look at the software product and a lot of directions which we can take when we are designing system and architecture, but in the end, each system can be observed as a composition of various modules or components.
Tekst by Stefan Mladenov, Tech Team @ Better Collective
Component-based software engineering
In general, component-based software engineering is a reuse-based approach which emphasizes separation of concerns principle, where loosely coupled independent modules of application work together in order to produce some result and solve some problem. This kind of approach, as any other, has its pros and cons, but the system developed in this way is easier to maintain, modify and test.
Component represents a distributable, replaceable, encapsulated part of the system which can work independently. In the context of web development, in the traditional paradigm, it can be classified as a server one, where it can be a simple function, class or service, or as a client one, widely known as web component, which can be any part of the website which needs to be reusable and encapsulated – building block.

Web Components
Web Components is a suite of different technologies, supported by all major browsers nowadays, used for creating reusable custom elements:
- Custom Elements
- ShadowDOM
- HTML Templates
In this way, we can create our own HTML tags with custom behavior (JS) and styling (CSS), without worrying about whether it is going to affect the rest of the page. Markup code is reduced and more organized, which results in better readability and less code repetition. Also, web components are web standardized which makes them future proof and easier to maintain.
Creating first Web Component
Firstly we need to define name of the new HTML tag and to follow some rules:
- Dash-cased name
- <custom-component>
- Unique name defined only once
- Cannot be self-closing tags
- <custom-component/>
Secondly, we need to create a JS class, named the same as the tag itself using a camel case notation. In that class we can define functionality of our component. In order to behave like a regular HTML tag, that class have to extend HTMLElement class in order to inherit all DOM characteristics:
- class CustomComponent extends HTMLElement {…}
Thirdly, we need to register our new tag in the CustomElementsRegistry and associate class which define its behavior:
- CustomElementsAPI
- customElemenst.define(‘custom-component’, CustomComponent)
- customElemenst.define(‘custom-component’, class extends HTMLElement {…})
- CustomElementsRegistry.define()
If we try to define an element with the same name twice, DOMException will be thrown.
Lifecycle hooks
From the moment when a custom element is created until the moment it’s destroyed, a lot of ‘things’ can happen, so there are some callback functions, called ‘Custom Elements Reactions’ used for reacting to those events. We do not have to reinvent the wheel and those hooks provide control over components behavior.
There are a few methods which we can listen and react appropriately:
- constructor
- super() – constructor of HTMLElement parent class – inheriting correct prototype chain
- triggered when we register/define new tag element in CustomElementsRegistry
- can be used for initialization, attaching event listeners, setting state, attaching shadowDOM
- in ES6 classes, defining constructor is optional since JS engine will initiate empty one, but for this purpose it is mandatory
- HTML attributes cannot be inspected here, since tag is not attached to the DOM yet
- connectedCallback
- triggered when tag is added in the DOM
- can be used for rendering layout, inspecting attributes, setting up things
- this method can be triggered more than once during its lifetime, if we add tag on more than one place
- disconnectedCallback
- triggered when tag is removed from the DOM
- can be used for cleanup logic like closing connections, unsubscribing from events, etc.
- this part here can be responsible for memory leaks if any
- attributeChangedCallback(attrName, oldVal, newVal)
- triggered when HTML tag attribute has changed – will be triggered only for the attributes which names are listed in method
- static get observedAttributes – which returns array of attribute names
- used for reacting on value change of some attribute
- triggered when HTML tag attribute has changed – will be triggered only for the attributes which names are listed in method
- adoptedChangedCallback
- very specific use-case
- triggered when element is adopted in new document
- element is not destroyed and created again so constructor will not be called when element is adopted
ShadowDOM
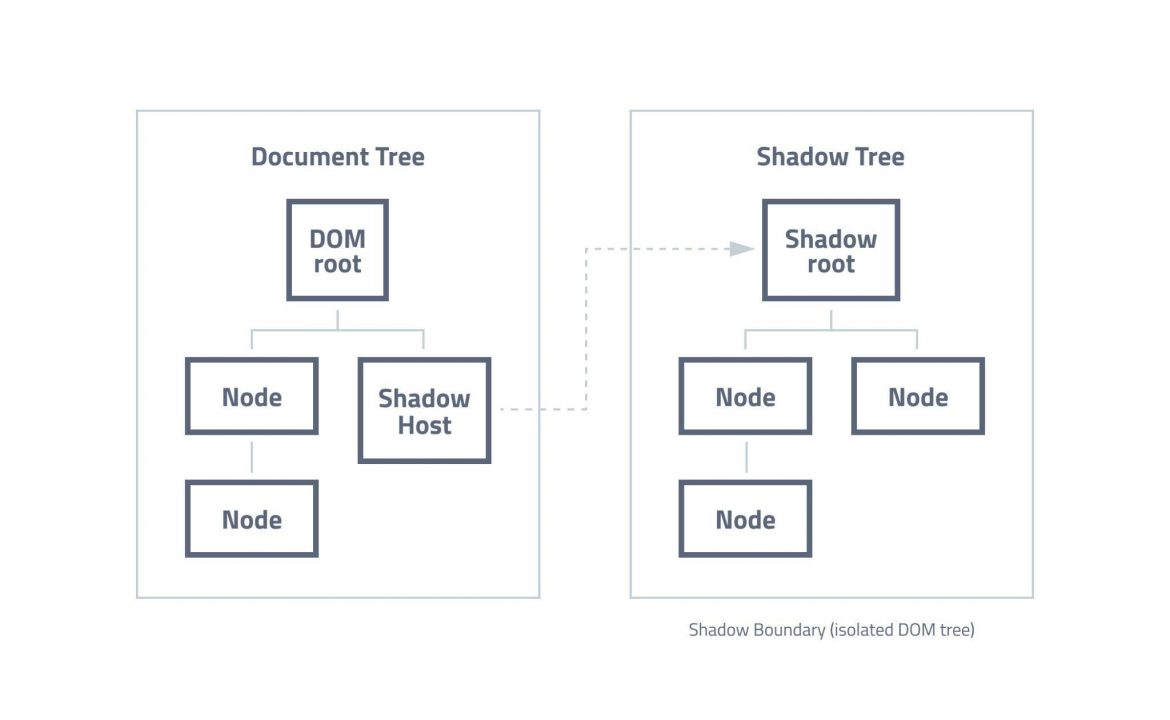
Important aspect of web components is isolation and encapsulation – to be sure that the code and styling of elements do not interfere with other elements and parts of the page. Shadow DOM API provides this functionality – creating a new virtual DOM inside the regular one with clear boundaries between those. ShadowDOM is a tree-like structure, which can be attached to some regular DOM element.
ShadowDom

ShadowDOM terminology
- Shadow host – Regular DOM node that shadow DOM tree is attached to
- Shadow tree – DOM tree inside shadow DOM
- Shadow boundary – place where shadow DOM ends, where regular one begins
- Shadow root – root node of shadow tree
Usage
Shadow DOM elements can be accessed and styled in the same way as regular DOM elements but without affecting the elements outside of it. We can think of shadowDOM as a <video> tag for example, which has a lot of buttons inside and structure itself, but we see only that tag from the hosting page context.
When we are attaching shadowDOM to element we can specify way of work which can be:
- open – element.attachShadow({mode: open})
- we can access shadow DOM using JS from main page context
- let shadowDOM = element.shadowRoot – returns shadowDOM
- closed – element.attachShadow({mode: closed})
- we cannot access shadow DOM from main page context
- let shadowDOM = element.shadowRoot – returns null
- interesting part here is that this can be even overcome in the closed mode, we can access with element._root and change something from outside, but in general, variables prefixed with ‘_’ should be left alone.
Styling in shadowDOM
Styles applied in the shadowDOM are encapsulated, there is no leaking outside of that tree and those stylings defined inside cannot affect styling of outer elements. On the other hand, stylings applied in the regular DOM that has shadowDOM attached to it can affect and override styling defined in the component.
Events in shadowDOM
When we are thinking of this kind of encapsulation and separate DOM tree, we have to think of event bubbling and what are the boundaries for them. There is composed flag for custom created events:
- true – we can listen and react for events fired from the shadowDOM outside of it
- false – closed, encapsulated events on the shadowDOM level only
On the other hand, some regular events are accessible from outer regular DOM such as:
- Focus: focus, blur, focusin, focusout
- Mouse: click, dblclick, mousedown, mouseover
- Wheel
- Input: beforeinput, input
- Keyboard: keydown, keyup
- Drag: dragstart, dragend, drag
Web component frameworks
Nowadays, there are a lot of frontend frameworks which offer developing components out of the box, such as React or Vue, but disadvantage of using them is unnecessary overhead which comes with those frameworks, which can result in bigger bundle size and sometimes introduce complexity, even if we want to do something simple.
Also, we are dependent on the whims and priorities of the development teams and users. Moreover, components written in some frameworks are rarely compatible with others, but this obstacle is overcome in frameworks like Stencil or Svelte, which offers development of framework agnostic components, which can be later built and transpiled for different target frameworks.
Stencil
Stencil is a toolchain for creating cross-framework, lightweight, future-proof web components which can be used without any framework at all or can be seamlessly integrated into some frontend framework such as Angular, React or Vue. It’s a compiler which generates Custom Elements by using the best concepts of the most popular frameworks:
- JSX support
- Typescript support
- Lazy-loading
- Asynchronous rendering pipeline
- Component prerendering
- Server-Side Rendering
- Static Site Generation
- Virtual DOM
- Objects as a properties(instead of just strings)
Stencil is a compile-time tool whose main goal is to provide great developer experience by offering a set of decorators, lifecycle hooks and rendering methods through its tiny API. Besides this, there is a built-in dev-server for testing and debugging, possibility for automatic generation of documentation, automatic optimization of components and test suite for writing unit and end-to-end tests.
Comparison with other frameworks
If we compare Stencil to React and Svelte in terms of performance by 4 major metrics used by lighthouse:
Desktop
|
Stencil |
React |
Svelte |
|
|
Total score |
100 | 94 |
99 |
| Speed index |
0.4s |
1.5s |
0.7s |
|
LCP |
0.3s | 1.1s |
1.0s |
| Time to interactive |
0.4s |
0.7s |
0.6s |
Mobile (2 runs)
| Stencil | React | Svelte | |
| Total score | 90, 92 | 72, 71 | 88, 98 |
| Speed index | 1.0s, 1.1s | 4.0s, 4.0s | 5.3s, 0.8s |
| LCP | 1.1s, 1.0s | 4.5s, 4.2s | 2.6s, 1.1s |
| Time to interactive | 1.4s, 1.5s, 1.4s | 6.4s, 6.7s | 2.3s, 0.7s |
For more info regarding performance, bundle size and other benchmarks you can visit:
Conclusion
To sum up, depending on the use case we can pick a framework to work with, but in general all of those are relying on some common principles of custom elements development, so if we know how things work below the surface, we can adapt to framework specifics.

